So, let’s see the code I used to get it working.
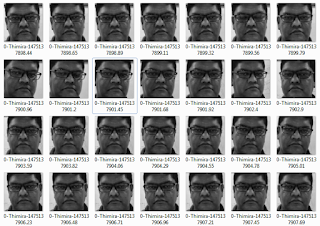
First of all, I needed a training dataset. For that, I created a set of face images of 10 subjects with around 500 images each.
 |
| The training dataset (yep, that's my face) |
I use a file naming convention as <subject_label>-<subject_name>-<unique_number>.jpg (e.g. 0-Thimira-1475137898.65.jpg) for the training images to make it easier to read in and get the metadata of the images in one go. (I will do a separate post on how to easily create training datasets of face images like this).
We'll mainly be using Keras to build the model, and scikit-learn for some utility functions. We’ll need to import the following packages,
 from sklearn.cross_validation import train_test_split
 from keras.optimizers import SGD
 from keras.utils import np_utils
 import numpy as np
 import argparse
 import cv2
 import os
 import sys
 from PIL import Image
We’ll be using the same LeNet model as the one used for the MNIST dataset,
 # import the necessary packages
 from keras.models import Sequential
 from keras.layers.convolutional import Convolution2D
 from keras.layers.convolutional import MaxPooling2D
 from keras.layers.core import Activation
 from keras.layers.core import Flatten
 from keras.layers.core import Dense

 class LeNet:

   @staticmethod
   def build(width, height, depth, classes, weightsPath=None):
     # initialize the model
     model = Sequential()

     # first set of CONV => RELU => POOL
     model.add(Convolution2D(20, 5, 5, border_mode="same",
                 input_shape=(depth, height, width)))
     model.add(Activation("relu"))
     model.add(MaxPooling2D(pool_size=(2, 2), strides=(2, 2)))

     # second set of CONV => RELU => POOL
     model.add(Convolution2D(50, 5, 5, border_mode="same"))
     model.add(Activation("relu"))
     model.add(MaxPooling2D(pool_size=(2, 2), strides=(2, 2)))

     # set of FC => RELU layers
     model.add(Flatten())
     model.add(Dense(500))
     model.add(Activation("relu"))

     # softmax classifier
     model.add(Dense(classes))
     model.add(Activation("softmax"))

     # if a weights path is supplied (inicating that the model was
     # pre-trained), then load the weights
     if weightsPath is not None:
       model.load_weights(weightsPath)

     # return the constructed network architecture
     return model
I use the following code to read in the images and create lists for the image data, the labels, and the label-name mappings,
 # Append all the absolute image paths in a list image_paths
 image_paths = [os.path.join(path, f) for f in os.listdir(path)]
 # images list will contain face image data. i.e. pixel intensities
 images = []
 # labels list will contain the label that is assigned to the image
 labels = []
 # dictionary/map with label to subject name
 name_map = {}

 for image_path in image_paths:
     # Read the image and convert to grayscale
     image_pil = Image.open(image_path).convert('L')
     # Convert the image format into numpy array
     image = np.array(image_pil, 'uint8')

     # Get the label of the image
     nbr = int(os.path.split(image_path)[1].split("-")[0])
     # Get the subject name for the label
     name = os.path.split(image_path)[1].split("-")[1]
     name_map[nbr] = name

     images.append(image)
     labels.append(nbr)
We’ll use the train_test_split method to split the training dataset to train and test sets. I used 10% of data as the test set.
(trainData, testData, trainLabels, testLabels) = train_test_split(images, labels, test_size=0.10)
We need to convert the labels form a numerical value to a categorical vector. E.g. the label 3 should be converted to [0, 0, 0, 1, 0, 0, 0, 0, 0, 0]. We use the np_utils.to_categorical method for that. The value 10 is the number of classes in the dataset – 10 faces in our data.
 trainLabels = np_utils.to_categorical(trainLabels, 10)
 testLabels = np_utils.to_categorical(testLabels, 10)
Then, we need to transform our training and test data to a format that can be consumed by Keras model,
 trainData = np.asarray(trainData)
 testData = np.asarray(testData)

 trainData = trainData[:, np.newaxis, :, :] / 255.0
 testData = testData[:, np.newaxis, :, :] / 255.0
Keras expects the input data to be a numpy array with the shape of (samples, channels, rows, cols). When we convert the image list to a numpy array – using np.asarray in above code – we get the shape (samples, rows, cols). We add in the channels dimension as a new axis - [:, np.newaxis, :, :] – since we only have 1 dimension (since our images are grayscale). The pixel values in the images range from 0 to 255. So finally, we make the pixel intensities to a value between 0 and 1 by dividing the whole array by 255.
With our data ready, we build, compile, fit, and evaluate the LeNet model. The width and height should be the width and height of your images.
 opt = SGD(lr=0.01)

 model = LeNet.build(width=244, height=244, depth=1, classes=10, weightsPath=args["weights"] if args["load_model"] > 0 else None)

 model.compile(loss="categorical_crossentropy", optimizer=opt, metrics=["accuracy"])

 model.fit(trainData, trainLabels, batch_size=128, nb_epoch=20, verbose=1)

 (loss, accuracy) = model.evaluate(testData, testLabels, batch_size=128, verbose=1)
 print("[INFO] accuracy: {:.2f}%".format(accuracy * 100))
We’ll be getting about 99% accuracy.
 |
| Accuracy of LeNet on our test dataset |
Finally, we’ll randomly pick some items from the test data, and see how the model predicts them,
 for i in np.random.choice(np.arange(0, len(testLabels)), size=(10, )):
     # classify the face
     probs = model.predict(testData[np.newaxis, i])

     print probs

     prediction = probs.argmax(axis=1)
     print probs[0][prediction]

     image = (testData[i][0] * 255).astype("uint8")

     name = "Subject " + str(prediction[0])
     if prediction[0] in name_map:
         name = name_map[prediction[0]]

     cv2.putText(image, name, (5, 20), cv2.FONT_HERSHEY_PLAIN, 1.3, (255, 255, 255), 2)

     # show the image and prediction
     print("[INFO] Predicted: {}, Actual: {}".format(
         prediction[0], np.argmax(testLabels[i])))
     cv2.imshow("Face", image)
     cv2.waitKey(0)
Here you see LeNet has successfully recognized my face.
 |
| LeNet recognizing my face |
 |
| LeNet successfully recognizing different face poses |
I'm planning to see whether we can use this on a real-time face recognition task also. Will keep you posted.
Related posts:
Can the LeNet model handle Face Recognition?
Build Deeper: Deep Learning Beginners' Guide is the ultimate guide for anyone taking their first step into Deep Learning.
Get your copy now!


I see that you have applied LeNet model which was used on MNIST dataset for classification to perform face recognition. So what do you think is the fundamental difference between the problem of "classification" and "recognition"?
ReplyDeleteHi Kushal,
DeleteThat's an interesting question.
If we take the terms 'classification' and 'recognition' generally (out of the context of 'face recognition'), then we can say the following:
Classification is when we group a set of items in to two or more categories, typically done via supervised learning using a labeled training set.
Recognition is when we attempt to identify general patters among our items set, typically done via unsupervised learning and without a training set.
However, when we come back into the context of 'Face Recognition' the terms are used out of their general meaning.
When we talk about Face Recognition, what we are actually doing is classification. (and all implementations of face recognition that I'm aware of are doing the same). We do use supervised learning, and we do use a training set.
An algorithm that can perceive a face and recognize it unsupervised is yet to be developed. It's a good hard problem to tackle.
Would like to hear your thoughts as well.
Your answer explains it all. Thank you!
DeleteHow can I create a dataset of images like you did.
ReplyDeleteThank you.
Hi Abhilash,
DeleteI've actually created a small Python script using OpenCV to create a set of face images from the webcam, and automatically save the cropped images of the face with a given label.
I'll soon do a post on how I did it with the full code of that script.
Hi, thanks you for this article.
ReplyDeleteHowever i would like to explain me how i can you this code i.e how i can execute it.
Thanks.
grate work thank you for sharing, so i have problem in inference phase of model, eg. i want to predict labels from some external images, so for that i have to save keras model right?, and lode it on front end script, now what should i do???? thankyou in advance
ReplyDeleteplease reply how you passes weights and save model through arguments...by giving the complete path ?
ReplyDeleteSir, can you please give your trained weights.
ReplyDeleteThe trained weight from my model would only work with the face dataset which I created and used.
Delete