I first had the idea about 8 years back. But back then, libraries that enable audio processing were scarce, and what was available required a massive effort to get installed. Now it seems that things have improved a lot. I myself was searching online for audio processing libraries for Python, and I came across this excellent post - Realtime Audio Visualization in Python - by Scott Harden of University of Florida.
 |
| Realtime Audio Visualization with PyAudio |
The tutorial uses the PyAudio Python package (PyAudio homepage), which is the Python bindings for PortAudio (PortAudio homepage) - a cross-platform audio I/O library - allowing PyAudio to give a consistent interface to process audio across platforms. So, I decided to give PyAudio a try. First of all, I needed to install PyAudio.
Installing PyAudio
At the time of this writing, the latest version of PyAudio is v0.2.9, and the PyAudio team has made the installation as simple as possible.
Windows
For Windows, there are pre-packaged binaries (wheels) for both 32-Bit and 64-Bit, for Python versions 2.7, 3.2, 3.3, 3.4, and 3.5. You can just use pip to install, pip install pyaudio These wheels contain the PortAudio v19 already included, so you won't need to install it separately.
Mac OS
For Mac OS, you will first need to install PortAudio using Homebrew, brew install portaudio
Then you can install PyAudio using pip,
pip install pyaudio There is also an Anaconda package for PyAudio for MacOS for only Python 2.7, which you can install by,
conda install pyaudio Linux
For Linux, the installation steps is bit similar to that of Mac OS: install the portaudio dependency first, and then install PyAudio using pip.If you try to install PyAudio without PortAudio, you will get an error like,
 src/_portaudiomodule.c:29:23: fatal error: portaudio.h: No such file or directory
    #include "portaudio.h"
               ^
   compilation terminated.
   error: command 'gcc' failed with exit status 1
 |
| Installation error when PortAudio is missing |
sudo apt-get install portaudio19-dev
 |
| PortAudio Development Package being installed |
pip install pyaudio
 |
| PyAudio installation completed successfully |
Note: If you run in to any errors while installing either PortAudio or PyAudio, check whether you have the Python development headers installed. The Python headers are by default installed if you are using Anaconda Python. If not, install them using,
sudo apt-get install python2.7-dev python3.5-dev
Testing out PyAudio
I've tried out the code example Scott Harden has given, to visualize the amplitude of the audio from the microphone (or whichever device that was set as the default audio input in the system).
 import pyaudio
 import numpy as np

 CHUNK = 2**11
 RATE = 44100

 p = pyaudio.PyAudio()
 stream = p.open(format=pyaudio.paInt16, channels=1, rate=RATE, input=True,
         frames_per_buffer=CHUNK)

 for i in range(int(10 * 44100 / 1024)): # go for a few seconds
   data = np.fromstring(stream.read(CHUNK), dtype=np.int16)
   peak = np.average(np.abs(data)) * 2
   bars = "#" * int(50 * peak / 2**16)
   print("%04d %05d %s" % (i, peak, bars))

 stream.stop_stream()
 stream.close()
 p.terminate()
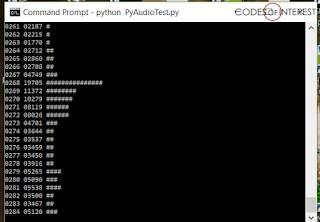
And the code runs perfectly,
 |
| PyAudio visualizing the input from the microphone in realtime |
Which means, using just the PyAudio package, we can get the audio data into a Python program in a format that we can manipulate. Which in turn means, we have a solution for the first step of our sound classification system - we now have a way to acquire the data, which we can then pre-process and used to build the model.
I'll keep you posted on how it goes.
Related links:
http://www.swharden.com/wp/2016-07-19-realtime-audio-visualization-in-python/
https://people.csail.mit.edu/hubert/pyaudio/
https://people.csail.mit.edu/hubert/pyaudio/docs/
https://pypi.python.org/pypi/PyAudio
Build Deeper: Deep Learning Beginners' Guide is the ultimate guide for anyone taking their first step into Deep Learning.
Get your copy now!


how to train on a bunch of audio samples, and then use the model to classify/identify regions where the trained audio samples occur
ReplyDelete