Sunday, February 26, 2017

How to solve CNMEM_STATUS_OUT_OF_MEMORY error with Theano on CUDA

Have yo come across the CNMEM_STATUS_OUT_OF_MEMORY error when using Theano with CUDA, with Keras? You might have been trying to train a slightly larger model, and just when the training starts it throws this error and fails.

The CNMEM_STATUS_OUT_OF_MEMORY thrown in Theano with CUDA
The CNMEM_STATUS_OUT_OF_MEMORY thrown in Theano with CUDA

The full error stack looks something like this,

Monday, February 20, 2017

Visualizing Model Structures in Keras

Update 3/May/2017: The steps mentioned in this post need to be slightly changed with the updates in Keras v2.*. Please check the updated guide here: Visualizing Keras Models - Updated.

Have you ever wanted to visualize the structure of a Keras model? When you have a complex model, sometimes it's easy to wrap your head around it if you can see a visual representation of it. What if there's a way to automatically build such a visual representation of a model?

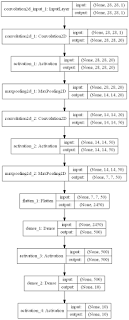
Well, there is a way. Keras has a model visualization function, that can plot out the structure of a model. It would look something like this,

The visualization of the LeNet model

Above is the visualization of the LeNet model, which is defined in code as follows,
 # initialize the model  
 model = Sequential()  
   
 # first set of CONV => RELU => POOL  
 model.add(Convolution2D(20, 5, 5, border_mode="same",  
     input_shape=(height, width, depth)))  
 model.add(Activation("relu"))  
 model.add(MaxPooling2D(pool_size=(2, 2), strides=(2, 2)))  
   
 # second set of CONV => RELU => POOL  
 model.add(Convolution2D(50, 5, 5, border_mode="same"))  
 model.add(Activation("relu"))  
 model.add(MaxPooling2D(pool_size=(2, 2), strides=(2, 2)))  
   
 # set of FC => RELU layers  
 model.add(Flatten())  
 model.add(Dense(500))  
 model.add(Activation("relu"))  
   
 # softmax classifier  
 model.add(Dense(classes))  
 model.add(Activation("softmax"))  

Thursday, February 16, 2017

TensorFlow 1.0 Released!

TensorFlow 1.0 has been released!

Just a week back I posted about the announcement of TensorFlow 1.0 and the new features coming. Now, it's finally here. It was released at the first TensorFlow Dev Summit held yesterday (15th Feb) at Mountain View, California.


The official TensorFlow website is now updated for the 1.0 release, which also now has a section for TensorFlow Fold which allows to work with input data of different shapes and sizes, and which has now been made open-source. The installation instructions have also been updated for the latest version, and they have added a guide on how to upgrade your application to TensorFlow 1.0.

The release notes for 1.0 suggests that all the anticipated features are here: The XLA compiler, Debugger, The Java API, Mobile support improvements, and much more. There's also news reports coming in which states that more machine learning models, such as SVMs, will come to TensorFlow. Better support for Keras is also hinted. I'm eagerly waiting for Keras to upgrade to support new features in TensorFlow 1.0.

Related posts:

Related links:

Build Deeper: Deep Learning Beginners' Guide is the ultimate guide for anyone taking their first step into Deep Learning.

Get your copy now!

Tuesday, February 14, 2017

How to solve Scikit-learn Deprecation Warning on cross_validation

When using the Scikit-learn library and trying out various examples found over the web, have you come across a DeprecationWarning for the cross_validation module?

The DeprecationWarning on cross_validation
This most commonly happens when the code you're trying to run utilizes the train_test_split() function - a handy function used to quickly split the training and test datasets from a main dataset. The full warning message is something like this,

 C:\Users\Thimira\Anaconda3\envs\tensorflow12\lib\site-packages\sklearn\cross_val  
 idation.py:44: DeprecationWarning: This module was deprecated in version 0.18 in  
  favor of the model_selection module into which all the refactored classes and f  
 unctions are moved. Also note that the interface of the new CV iterators are dif  
 ferent from that of this module. This module will be removed in 0.20.  
  "This module will be removed in 0.20.", DeprecationWarning)  

So, how to solve this?

Friday, February 10, 2017

TensorFlow 1.0 announced with better Mobile support and Java API

TensorFlow, with its r0.12 version gave the (much awaited) compatibility to Windows (check How to setup TensorFlow on Windows), and an Experimental API for the GO language. Now, they have announced the first major version - version r1.0 - of TensorFlow, with several exciting features.


While Python would still be the primary API - and would be the most complete API for TensorFlow - version r1.0 will introduce a new, experimental Java API. While it could be far from complete, and may take a few releases to stabilize, having the Java API may open TensorFlow to new possibilities. Also note that in the current release candidates of r1.0, you will need to compile TensorFlow from source in order to get the Java interface (instructions from TensorFlow GitHub page), and it's still only available for Linux and Mac OS.

Wednesday, February 8, 2017

Installing OpenCV 3 on Anaconda Python 3.5 on Windows

If you checked my last post, you know that TensorFlow now officially works on Windows. This was really exciting to me, since I was using a Linux machine for my TensorFlow experiments, I had to switch between the Linux and Windows for my other tasks. Now, I should be able to perform some of those experiments on Windows as well. (I would still switch to Linux for more processor intensive deep learning models). So, I decided to set everything up on Windows again.

I've been using OpenCV 3 on Anaconda Python 3.5 on Linux. (Check out my guide on Installing OpenCV from source on Anaconda Python on Ubuntu 16.10 if you are trying to install on Linux). But on Windows, I've previously only tried OpenCV on Python 2.7. Since the OpenCV Downloads page has pre-built binaries for OpenCV 3 (version 3.2 being latest), I thought the installation would be straightforward.

I downloaded and ran the OpenCV 3.2 installer (which just extracts OpenCV to a directory of your choosing), set the OPENCV_DIR environment variable, add the bin dir in OpenCV to the PATH, and finally copy the cv2.pyd file to the site-packages directory in my Anaconda environment. I fired up the Anaconda environment, and tried loading cv2 in Python. But I got the following error,

 (tensorflow) C:\>python  
 Python 3.5.2 |Continuum Analytics, Inc.| (default, Jul 5 2016, 11:41:13) [MSC v  
 .1900 64 bit (AMD64)] on win32  
 Type "help", "copyright", "credits" or "license" for more information.  
 >>> import cv2  
 Traceback (most recent call last):  
  File "<stdin>", line 1, in <module>  
 ImportError: DLL load failed: The specified module could not be found.  

Thursday, February 2, 2017

Setting up TensorFlow on Windows

TensorFlow, since it has been released just over an year ago, has gained a huge popularity with its capabilities. But the platforms it worked on was limited - there were only pre-packaged Python packages for Linux initially, while it gained a Mac OS compatible version along the way. Windows users were left wondering when (or if) there will be a Windows version of TensorFlow. There has been few unofficial builds for Windows, and some have attempted to build from source for Windows with various degrees of success. But, there was nothing official.

Now, I'm happy to learn that TensorFlow now officially supports Windows. The release notes suggests that Windows compatibility was present from TensorFlow v0.12.0 RC0, and it has been tested on Windows 7, Windows 10, and Windows Server 2016. It only supports 64-Bit Python 3.5. Both the standard Python distribution (from Python.org) and Anaconda Python are supported.

TensorFlow Logo


This was great news for me, since I was switching between Linux and Windows for my machine learning experiments. So, I gave a try to setup TensorFlow on Windows.

I've been using Anaconda Python for most of my experiments, so I created an Anaconda environment - named 'tensorflow' - with all the basic packages I need.
 conda create --name tensorflow numpy scipy scikit-learn pillow h5py mingw libpython  

Then I activated the environment I just created,
 activate tensorflow  

Now for the big step, installing TensorFlow from pip.