 cv2.putText(image,
           text_to_show,
           (20, 40),
           fontFace=cv2.FONT_HERSHEY_SIMPLEX,
           fontScale=1,
           color=(255, 255, 255))
OpenCV also gives you a choice from a handful of fonts - all variants of the "Hershey" font.
But, there may come a point where you want more fonts. Have you wished that you could use a specific True Type or Open Type font on OpenCV?
The good news is, it's possible.
 |
| True Type Fonts working on OpenCV |
First, let's see what the built-in font choices we have in OpenCV.
In OpenCV, we have the following 8 fonts available,
- Hershey Simplex
- Hershey Plain
- Hershey Duplex
- Hershey Complex
- Hershey Triplex
- Hershey Complex Small
- Hershey Script Simplex
- Hershey Script Complex
Let's use the following simple script to see how all of them looks like,
 import cv2
 import numpy as np

 # create a blank image, black background
 blank_image = np.zeros((500,1000,3), np.uint8)

 text_to_show = "The quick brown fox jumps over the lazy dog"

 cv2.putText(blank_image,
           "Hershey Simplex : " + text_to_show,
           (20, 40),
           fontFace=cv2.FONT_HERSHEY_SIMPLEX,
           fontScale=1,
           color=(255, 255, 255))

 cv2.putText(blank_image,
           "Hershey Plain : " + text_to_show,
           (20, 80),
           fontFace=cv2.FONT_HERSHEY_PLAIN,
           fontScale=1,
           color=(255, 255, 255))

 cv2.putText(blank_image,
           "Hershey Duplex : " + text_to_show,
           (20, 120),
           fontFace=cv2.FONT_HERSHEY_DUPLEX,
           fontScale=1,
           color=(255, 255, 255))

 cv2.putText(blank_image,
           "Hershey Complex : " + text_to_show,
           (20, 160),
           fontFace=cv2.FONT_HERSHEY_COMPLEX,
           fontScale=1,
           color=(255, 255, 255))

 cv2.putText(blank_image,
           "Hershey Triplex : " + text_to_show,
           (20, 200),
           fontFace=cv2.FONT_HERSHEY_TRIPLEX,
           fontScale=1,
           color=(255, 255, 255))

 cv2.putText(blank_image,
           "Hershey Complex Small : " + text_to_show,
           (20, 240),
           fontFace=cv2.FONT_HERSHEY_COMPLEX_SMALL,
           fontScale=1,
           color=(255, 255, 255))

 cv2.putText(blank_image,
           "Hershey Script Simplex : " + text_to_show,
           (20, 280),
           fontFace=cv2.FONT_HERSHEY_SCRIPT_SIMPLEX,
           fontScale=1,
           color=(255, 255, 255))

 cv2.putText(blank_image,
           "Hershey Script Complex : " + text_to_show,
           (20, 320),
           fontFace=cv2.FONT_HERSHEY_SCRIPT_COMPLEX,
           fontScale=1,
           color=(255, 255, 255))

 cv2.imshow('Fonts', blank_image)
 cv2.waitKey(0)

 cv2.destroyAllWindows()
 |
| All the Fonts in OpenCV |
That's a good selection of fonts.
But, we can always use more, right?
Well, OpenCV itself cannot load custom fonts. But we can achieve it using the handy Pillow/PIL package.
Pillow has an ImageFont module, which is used to draw text on images.
Using the ImageFont.truetype() function, you can load a True Type or an Open Type font file.
Note: although the function is named truetype() it can use Open Type fonts also.
 from PIL import ImageFont, ImageDraw, Image

 image = Image.open("Me.png")

 draw = ImageDraw.Draw(image)

 # use a truetype font
 font = ImageFont.truetype("arial.ttf", 15)

 draw.text((10, 25), "world", font=font)

 image.save("Me_with_text.png")
Sounds good. But, how do we use that with OpenCV?
Simple. We pass the OpenCV image to PIL, let PIL draw the text on it, and get the image back to OpenCV. We just need to remember to re-order the colour channels, as OpenCV uses BGR, and PIL uses RGB.
Here, I'm using the "Papyrus" font. You can place the font file in the same directory as the Python script, or you can give the full path to the fonts file.
 from PIL import ImageFont, ImageDraw, Image
 import cv2
 import numpy as np

 text_to_show = "The quick brown fox jumps over the lazy dog"

 # Load image in OpenCV
 image = cv2.imread("Me.jpg")

 # Convert the image to RGB (OpenCV uses BGR)
 cv2_im_rgb = cv2.cvtColor(image,cv2.COLOR_BGR2RGB)

 # Pass the image to PIL
 pil_im = Image.fromarray(cv2_im_rgb)

 draw = ImageDraw.Draw(pil_im)
 # use a truetype font
 font = ImageFont.truetype("PAPYRUS.ttf", 80)

 # Draw the text
 draw.text((10, 700), text_to_show, font=font)

 # Get back the image to OpenCV
 cv2_im_processed = cv2.cvtColor(np.array(pil_im), cv2.COLOR_RGB2BGR)

 cv2.imshow('Fonts', cv2_im_processed)
 cv2.waitKey(0)

 cv2.destroyAllWindows()
The result looks good,
 |
| The "Papyrus" font loaded on OpenCV |
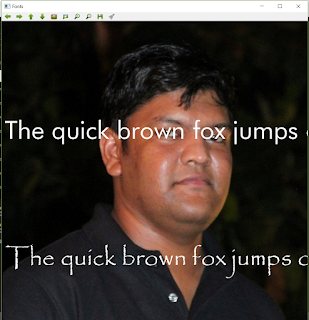
You can use multiple fonts as well. Just create and use different font objects.
 # use a truetype font
 font_futura = ImageFont.truetype("Futura-Book.ttf", 80)
 font_papyrus = ImageFont.truetype("PAPYRUS.ttf", 80)

 # Draw the text
 draw.text((10, 700), text_to_show, font=font_papyrus)
 draw.text((10, 300), text_to_show, font=font_futura)
 |
| Multiple True Type Fonts working on OpenCV |
Try it out, and see what cool text styles you can use on your OpenCV applications.
Related links:
http://pillow.readthedocs.io/en/3.1.x/reference/ImageFont.html
https://stackoverflow.com/questions/14134892/convert-image-from-pil-to-opencv-format
https://stackoverflow.com/questions/13576161/convert-opencv-image-into-pil-image-in-python-for-use-with-zbar-library
Build Deeper: The Path to Deep Learning
Learn the bleeding edge of AI in the most practical way: By getting hands-on with Python, TensorFlow, Keras, and OpenCV. Go a little deeper...
Get your copy now!


this was extremely helpful, thank you for the great writeup!
ReplyDeleteThank you for this extremely useful post.
ReplyDeleteTried a bunch of guides, and this is the one that worked. Thank you so much for making this!
ReplyDelete