Training an Image Classification model - even with Deep Learning - is not an easy task. In order to get sufficient accuracy, without overfitting requires a lot of training data. If you try to train a deep learning model from scratch, and hope build a classification system with similar level of capability of an ImageNet-level model, then you'll need a dataset of about a million training examples (plus, validation examples also). Needless to say, it's not easy to acquire, or build such a dataset practically.
So, is there any hope for us to build a good image classification system ourselves?
Yes, there is!
Luckily, Deep Learning supports an immensely useful feature called 'Transfer Learning'. Basically, you are able to take a pre-trained deep learning model - which is trained on a large-scale dataset such as ImageNet - and re-purpose it to handle an entirely different problem. The idea is that since the model has already learned certain features from a large dataset, it may be able to use those features as a base to learn the particular classification problem we present it with.
This task is further simplified since popular deep learning models such as VGG16 and their pre-trained ImageNet weights are readily available. The Keras framework even has them built-in in the keras.applications package.
 |
| An image classification system built with transfer learning |
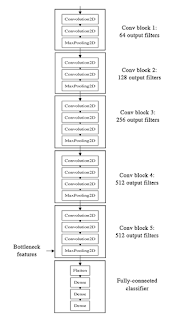
The basic technique to get transfer learning working is to get a pre-trained model (with the weights loaded) and remove final fully-connected layers from that model. We then use the remaining portion of the model as a feature extractor for our smaller dataset. These extracted features are called "Bottleneck Features" (i.e. the last activation maps before the fully-connected layers in the original model). We then train a small fully-connected network on those extracted bottleneck features in order to get the classes we need as outputs for our problem.
 |
| How bottleneck feature extraction works on the VGG16 model (Image from: https://blog.keras.io) |
The Keras Blog has an excellent guide on how to build an image classification system for binary classification ('Cats' and 'Dogs' in their example) using bottleneck features. You can find the guide here: Building powerful image classification models using very little data.
However, the Keras guide doesn't show to use the same technique for multi-class classification, or how to use the finalized model to make predictions.
So, here's my tutorial on how to build a multi-class image classifier using bottleneck features in Keras running on TensorFlow, and how to use it to predict classes once trained.
Let's get started.
In this tutorial, I'm going to build a classifier for 10 different bird images. I only had around 150 images per class, which is nowhere near enough data to train a model from scratch.
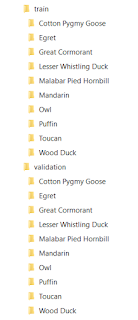
First of all, we need to structure our training and validation datasets. We'll be using the ImageDataGenerator and flow_from_directory() functionality of Keras, so we need to create a directory structure where images of each class sits within its own sub-directory in the training and validation directories. So, I created the following directory structure,
 |
| Training and Validation datasets, structured into their own directories |
Make sure all the sub-directories (classes) in the training set are present in the validation set also. And, remember that the names of the sub-directories will be the names of your classes.
In order to build out model, we need to go through the following steps,
- Save the bottleneck features from the VGG16 model.
- Train a small network using the saved bottleneck features to classify our classes, and save the model (we call this the 'top model').
- Use both the VGG16 model along with the top model to make predictions.
We start the code by importing the necessary packages,
 import numpy as np
 from keras.preprocessing.image import ImageDataGenerator, img_to_array, load_img
 from keras.models import Sequential
 from keras.layers import Dropout, Flatten, Dense
 from keras import applications
 from keras.utils.np_utils import to_categorical
 import matplotlib.pyplot as plt
 import math
 import cv2
We'll be using OpenCV to display the result of a prediction. You can omit it if not needed.
Matplotlib is used to graph the model training history, so that we can see how well the model trained. See How to Graph Model Training History in Keras for more details on it.
We then define couple of parameters,
 # dimensions of our images.
 img_width, img_height = 224, 224

 top_model_weights_path = 'bottleneck_fc_model.h5'
 train_data_dir = 'data/train'
 validation_data_dir = 'data/validation'

 # number of epochs to train top model
 epochs = 50
 # batch size used by flow_from_directory and predict_generator
 batch_size = 16
We add a function - save_bottlebeck_features() - to save the bottleneck features from the VGG16 model.
In the function, we create the VGG16 model - without the final fully-connected layers (by specifying include_top=False) - and load the ImageNet weights,
model = applications.VGG16(include_top=False, weights='imagenet')
We then create the data generator for training images, and run them on the VGG16 model to save the bottleneck features for training.
 datagen = ImageDataGenerator(rescale=1. / 255)

 generator = datagen.flow_from_directory(
     train_data_dir,
     target_size=(img_width, img_height),
     batch_size=batch_size,
     class_mode=None,
     shuffle=False)

 nb_train_samples = len(generator.filenames)
 num_classes = len(generator.class_indices)

 predict_size_train = int(math.ceil(nb_train_samples / batch_size))

 bottleneck_features_train = model.predict_generator(
     generator, predict_size_train)

 np.save('bottleneck_features_train.npy', bottleneck_features_train)
generator.filenames contains all the filenames of the training set. By getting its length, we can get the size of the training set.
generator.class_indices is the map/dictionary for the class-names and their indexes. Getting its length gives us the number of classes.
There is a small bug in predict_generator, where it can't determine the correct number of iterations when working on batches when the number of training samples isn't divisible by the batch size. So, we calculate it ourselves with the 'predict_size_train = int(math.ceil(nb_train_samples / batch_size))' line.
We do the same for the validation data,
 generator = datagen.flow_from_directory(
     validation_data_dir,
     target_size=(img_width, img_height),
     batch_size=batch_size,
     class_mode=None,
     shuffle=False)

 nb_validation_samples = len(generator.filenames)

 predict_size_validation = int(math.ceil(nb_validation_samples / batch_size))

 bottleneck_features_validation = model.predict_generator(
     generator, predict_size_validation)

 np.save('bottleneck_features_validation.npy', bottleneck_features_validation)
With the bottleneck features saved, now we're ready to train our top model. We define a function for that also - train_top_model().
In order to train the top model, we need the class labels for each of the training/validation samples. We use a data generator for that also. We also need to convert the labels to categorical vectors.
 datagen_top = ImageDataGenerator(rescale=1./255)
 generator_top = datagen_top.flow_from_directory(
         train_data_dir,
         target_size=(img_width, img_height),
         batch_size=batch_size,
         class_mode='categorical',
         shuffle=False)

 nb_train_samples = len(generator_top.filenames)
 num_classes = len(generator_top.class_indices)

 # load the bottleneck features saved earlier
 train_data = np.load('bottleneck_features_train.npy')

 # get the class lebels for the training data, in the original order
 train_labels = generator_top.classes

 # convert the training labels to categorical vectors
 train_labels = to_categorical(train_labels, num_classes=num_classes)
We do the same for validation features as well,
 generator_top = datagen_top.flow_from_directory(
         validation_data_dir,
         target_size=(img_width, img_height),
         batch_size=batch_size,
         class_mode=None,
         shuffle=False)

 nb_validation_samples = len(generator_top.filenames)

 validation_data = np.load('bottleneck_features_validation.npy')

 validation_labels = generator_top.classes
 validation_labels = to_categorical(validation_labels, num_classes=num_classes)
Now create and train a small fully-connected network - the top model - using the bottleneck features as input, with our classes as the classifier output.
 model = Sequential()
 model.add(Flatten(input_shape=train_data.shape[1:]))
 model.add(Dense(256, activation='relu'))
 model.add(Dropout(0.5))
 model.add(Dense(num_classes, activation='sigmoid'))

 model.compile(optimizer='rmsprop',
              loss='categorical_crossentropy', metrics=['accuracy'])

 history = model.fit(train_data, train_labels,
          epochs=epochs,
          batch_size=batch_size,
          validation_data=(validation_data, validation_labels))

 model.save_weights(top_model_weights_path)

 (eval_loss, eval_accuracy) = model.evaluate(
     validation_data, validation_labels, batch_size=batch_size, verbose=1)

 print("[INFO] accuracy: {:.2f}%".format(eval_accuracy * 100))
 print("[INFO] Loss: {}".format(eval_loss))
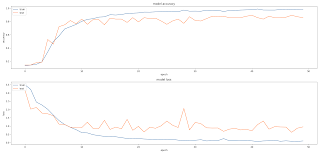
It's always better to see how well a model gets trained. So, we graph the training history,
 plt.figure(1)

 # summarize history for accuracy

 plt.subplot(211)
 plt.plot(history.history['acc'])
 plt.plot(history.history['val_acc'])
 plt.title('model accuracy')
 plt.ylabel('accuracy')
 plt.xlabel('epoch')
 plt.legend(['train', 'test'], loc='upper left')

 # summarize history for loss

 plt.subplot(212)
 plt.plot(history.history['loss'])
 plt.plot(history.history['val_loss'])
 plt.title('model loss')
 plt.ylabel('loss')
 plt.xlabel('epoch')
 plt.legend(['train', 'test'], loc='upper left')
 plt.show()
Now we're ready to train our model. We call the two functions in sequence,
 save_bottlebeck_features()
 train_top_model()
 |
| The top model training |
The training takes about 2 minutes on a GPU. On CPU however, it may take about 30 minutes.
 |
| The accuracy and loss of training and validation |
I got around ~90% accuracy, and it doesn't looks like the model if overfitting. Which is awesome, since I only had around 150 images per class.
How to make a prediction from the trained model?
With our classification model trained - from the bottleneck features of a pre-trained model - the next question would be how we can use it. That is, how do we make a prediction using the model we just built?
In order to predict the class of an image, we need to run it through the same pipeline as before. Which means,
- We first run the image through the pre-trained VGG16 model (without the fully-connected layers again) and get the bottleneck predictions.
- We then run the bottleneck prediction through the trained top model - which we created in the previous step - and get the final classification.
We first load and pre-process the image,
 image_path = 'data/eval/Malabar_Pied_Hornbill.png'

 orig = cv2.imread(image_path)

 print("[INFO] loading and preprocessing image...")
 image = load_img(image_path, target_size=(224, 224))
 image = img_to_array(image)

 # important! otherwise the predictions will be '0'
 image = image / 255

 image = np.expand_dims(image, axis=0)
Pay close attention to the 'image = image / 255' step. Otherwise, all your predictions will be '0'.
Why is this needed? Remember that in our ImageDataGenerator we set rescale=1. / 255, which means all data is re-scaled from a [0 - 255] range to [0 - 1.0]. So, we need to do the same to the image we're trying to predict.
Now we run the image through the same pipeline,
 # build the VGG16 network
 model = applications.VGG16(include_top=False, weights='imagenet')

 # get the bottleneck prediction from the pre-trained VGG16 model
 bottleneck_prediction = model.predict(image)

 # build top model
 model = Sequential()
 model.add(Flatten(input_shape=bottleneck_prediction.shape[1:]))
 model.add(Dense(256, activation='relu'))
 model.add(Dropout(0.5))
 model.add(Dense(num_classes, activation='sigmoid'))

 model.load_weights(top_model_weights_path)

 # use the bottleneck prediction on the top model to get the final classification
 class_predicted = model.predict_classes(bottleneck_prediction)
 inID = class_predicted[0]

 class_dictionary = generator_top.class_indices

 inv_map = {v: k for k, v in class_dictionary.items()}

 label = inv_map[inID]

 # get the prediction label
 print("Image ID: {}, Label: {}".format(inID, label))

 # display the predictions with the image
 cv2.putText(orig, "Predicted: {}".format(label), (10, 30), cv2.FONT_HERSHEY_PLAIN, 1.5, (43, 99, 255), 2)

 cv2.imshow("Classification", orig)
 cv2.waitKey(0)
 cv2.destroyAllWindows()
The class_indices has the label as the key, and the index as the value.
e.g. In my example it looks like this,
{'Owl': 6, 'Wood Duck': 9, 'Toucan': 8, 'Puffin': 7, 'Malabar Pied Hornbill': 4, 'Egret': 1, 'Cotton Pygmy Goose': 0, 'Great Cormorant': 2, 'Mandarin': 5, 'Lesser Whistling Duck': 3}
Since the prediction prom the model give the index, it would be easier for us if we had a dictionary with index as the key and the label as the value. So, we invert the class_indices like this: inv_map = {v: k for k, v in class_dictionary.items()}
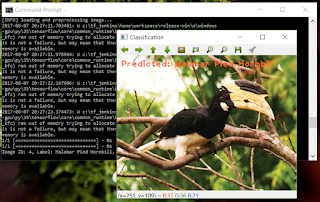
We use OpenCV to show the image, with its predicted class.
 |
| The result of a classification |
The complete code for this tutorial can be found here at GitHub.
You'll notice that the code isn't the most optimized. We can easily extract some of the repeated code - such as the multiple image data generators - out to some functions. But, I kept them as is since it's easier to walk through the code like that. You can share your thoughts on what's the best way to streamline the code.
We didn't cover fine-tuning the model to achieve even higher accuracy. I will cover it in a future tutorial.
Related links:
Build Deeper: The Path to Deep Learning
Learn the bleeding edge of AI in the most practical way: By getting hands-on with Python, TensorFlow, Keras, and OpenCV. Go a little deeper...
Get your copy now!


Very good tutorial. What about doing random transformations in the image generation phase?
ReplyDeleteThank you.
DeleteYes, adding some random transformations to the training images should improve the accuracy in theory (at least, reduce the chance of overfitting). We can easily enable transformations by adding some data augmentation parameters (shear_range, zoom_range, horizontal_flip) to the ImageDataGenerator used for training dataset.
I haven't tested it yet though. I'll try it out and post the results on how data augmentations affect the accuracy. If you get to try it out, let us know the results also.
In my case, data augmentation doesn't help. The accuracy goes from 74% to 69% if I apply the augmentation step from keras blog. Don't know why, but it's weird af.
DeleteSame thing happened with me !
DeleteHello, do you know by any chance what could cause this problem:
ReplyDelete"Traceback (most recent call last):
File "train3.py", line 233, in
save_bottlebeck_features()
File "train3.py", line 65, in save_bottlebeck_features
generator, predict_size_train)
File "/usr/local/lib/python2.7/dist-packages/Keras-1.2.2-py2.7.egg/keras/engine/training.py", line 1781, in predict_generator
all_outs[i][processed_samples:(processed_samples + nb_samples)] = out
ValueError: could not broadcast input array from shape (16,7,7,512) into shape (13,7,7,512)", any help would be highly appreciated. Thanks in advance.
Hi,
DeleteHow many training samples do you have?
It seems Keras is only finding 13 samples.
The code feeds the samples to the predict generator in batches of 16. From the error message it looks like it's unable to find enough samples to fit a single batch.
Can you check?
Thanks for the quick reply. For my PoC purposes I'm using cats vs dogs sample with 1000 images in the training set for each class, the output at the begining is as as follows: "Found 2000 images belonging to 2 classes.
Delete2000
{'cats': 0, 'dogs': 1}
2"
I guess that should be ok as 2000/2 is 125. By trial and error I have changed the number of images to 2008/2016/2024 and with 2024 it does indeed work although I have no idea why, now the problem is with validation set prediction and the same error (could not broadcast input array from shape (16,7,7,512) into shape (2,7,7,512)). I have 400 images for each class (800 all together). Do you know how to calculate the proper number of train/test images?
Sorry, my bad, it does work with 2048 files in the training set
DeleteOk, I've found that the issue is caused by the older version of Keras (1.2.2). With 2.0 all looks good so far. Thanks again for your help.
DeleteGlad you were able to find a solution. I'll add a note to the article to verify the Keras version.
DeleteHi!
DeleteI got:
Intel 2.7 GHz with 8GB.
I took the training data and run it on the VGG16 model to save the bottleneck features.
It seem to take forever.
how much time it should take? what am i doing wrong?
Thanks,
Or
Hi OrRim,
DeleteThese models does take time to train. With the dataset I took for this example - around 2000 images - it takes more than an hour if I train it on CPU. When trained on a GPU (via NVIDIA CUDA) the training completes in around 15 minutes.
A larger dataset would take even more time. It is quite normal for models like these to take a lot of time to train.
Thanks for the great tutorial!
ReplyDeleteIn my code I had to fix the lines involving the 'ceil' function:
int(math.ceil(nb_train_samples / batch_size))
In python 2.7 this resulted in saving less bottlenecks than existing, because of the integer division. Casting batch_size to float fixed the issue:
int(math.ceil(nb_train_samples / float(batch_size)))
The same has to be done for the validation bottlenecks respectively.
I have one question though:
The resulting bottleneck files are huge! In my case they are bigger than the total size of all training images. Is it possible that this method stores the whole weights and not just the top layer?
Or do you have any clue what the reason might be. Thanks!
Ah, I'll put a note about the integer division problem. Thanks!
DeleteAs for the size of the bottleneck features,
The bottleneck features are not the weights. They are the activation maps of each input from the final convolution layer of the network. So, they are basically (num_training_samples * size_of_activation_map). So, depending on the dataset, there is a chance that the bottleneck features are larger than the dataset file size.
Tats a great post :) do you mind coming up with a post on solving multiclass multi-label classification problems (single image having multiple labels) with Keras? Or do you know any good resource that could help me find such codes? Looking forward.
ReplyDeleteWhy are you building your model again when predicting from a model that has already been trained? In other words, you have computed bottleneck features, built a model to use those features and trained it. Shouldn't your prediction on new image just be the following steps? (i) compute bottleneck features for a new image (ii) use weights from trained model and predict classification. Why do you have to build a model again during the prediction step?
ReplyDeleteThanks
ValueError: Dimension 0 in both shapes must be equal, but are 25088 and 8192 for 'Assign_52' (op: 'Assign') with input shapes: [25088,256], [8192,256].
ReplyDeletesir, i am having this error whar should i do ?
Hi, I am encountering the same problem. Did you have any luck fixing it??
DeleteEpoch 12/50
ReplyDelete6680/6680 [==============================] - 9s 1ms/step - loss: 3.7119 - acc: 0.1298 - val_loss: 3.9675 - val_acc: 0.1593
Epoch 13/50
6680/6680 [==============================] - 9s 1ms/step - loss: 3.6549 - acc: 0.1395 - val_loss: 3.7386 - val_acc: 0.1581
Epoch 14/50
6680/6680 [==============================] - 9s 1ms/step - loss: 3.6398 - acc: 0.1440 - val_loss: 3.8301 - val_acc: 0.1545
Epoch 15/50
6680/6680 [==============================] - 9s 1ms/step - loss: nan - acc: 0.1337 - val_loss: nan - val_acc: 0.0096
Epoch 16/50
6680/6680 [==============================] - 9s 1ms/step - loss: nan - acc: 0.0096 - val_loss: nan - val_acc: 0.0096
Epoch 17/50
6680/6680 [==============================] - 10s 2ms/step - loss: nan - acc: 0.0096 - val_loss: nan - val_acc: 0.0096
Epoch 18/50
6680/6680 [==============================] - 10s 1ms/step - loss: nan - acc: 0.0096 - val_loss: nan - val_acc: 0.0096
Epoch 19/50
6680/6680 [==============================] - 10s 2ms/step - loss: nan - acc: 0.0096 - val_loss: nan - val_acc: 0.0096
Epoch 20/50
4128/6680 [=================>............] - ETA: 4s - loss: nan - acc: 0.0099
sir why should i get loss = none ? any reason ?
Since the code is aiming to do multi-class classification, shouldn't the last layer activation be softmax instead of sigmoid?
ReplyDeleteYes, we can use softmax instead of sigmoid.
Deleteyou can use sigmoid for multi-class classification. In this case use class_mode='categorical' in flow_from_directory()
ReplyDelete& loss='binary_crossentropy' in compile()
changing the class_mode to categorical appears the following error Input arrays should have the same number of samples as the target arrays. Found 1776 input samples and 1778 target samples.
ReplyDeleteHello, I'm trying to run the code in a problem containing 12 classes, 1778 images for training and 621 for validation.
ReplyDeleteError checking target: dense_2 expected to have form (12), but has array with form (1,)
changing the class_mode to categorical appears the following error Input arrays should have the same number of samples as the target arrays. Found 1776 input samples and 1778 target samples.
Can you help me, what am I doing wrong?
Got same error... Did you find solution???
DeleteHi, I am having some issues on predicting, I cant seem to load the weights that I obtained from training the model. I am getting ValueError: Dimension 0 must be equal.
ReplyDeleteAny help on this would be greatly appreciated
Which data set is used here?
ReplyDeleteIt was one of my own datasets: some images from my own photography merged with images found from few other sources.
DeleteHey @Thimira Amaratunga
ReplyDeleteI am trying to train on my own dataset, but it seems to have stuck in the starting itself. Here's the traceback:
C:\Program Files (x86)\Python35\lib\site-packages\h5py\__init__.py:36: FutureWarning: Conversion of the second argument of issubdtype from `float` to `np.floating` is deprecated. In future, it will be treated as `np.float64 == np.dtype(float).type`.
from ._conv import register_converters as _register_converters
Using TensorFlow backend.
2018-06-06 19:38:41.194659: I C:\tf_jenkins\home\workspace\rel-win\M\windows\PY\35\tensorflow\core\platform\cpu_feature_guard.cc:137] Your CPU supports instructions that this TensorFlow binary was not compiled to use: AVX AVX2
Found 24635 images belonging to 12 classes.
24635
{'Down': 4, 'Apert': 2, 'Angelman': 1, 'FragileX': 5, 'Sotos': 8, 'Williams': 11, 'Progeria': 7, 'Marfan': 6, 'Turner': 10, '22q11': 0, 'CDL': 3, 'Treacher Collins': 9}
12
Thanks a lot! This has been really useful.
ReplyDeleteAwesome tutorial! I used it on my own image classification for 4 different species and it worked well! Have you had a chance to do a tutorial on refining the model for higher accuracy? I checked the articles but wasn't able to find it. I would love to see it, if so! Thanks!
ReplyDeleteI'm working on a tutorial on fine-tuning the model. Will be publishing soon :)
DeleteHi! Have you finished the tutorial on fine-tuning the model? Your tutorial is so useful that I want to see more. Thanks.
DeleteHi quick question. You are using the term validation for some dataset, but in some of the pictures you refer to them as a test dataset. Have you used a validation set in this tutorial as an test dataset. Or was it also used to tune some parameters? Thanks for the great tutorial btw!
ReplyDeleteHi Thimira, have you been using the dataset as a validation set or test dataset. Because in the plots you refer to the validation set as a test dataset. Does that mean you have not used the validation set to tune your model and was it purely testing?
ReplyDeleteLooks like I haven't been consistent with what I referred as validation set. Let me fix that.
DeleteHi Thimira, I am trying to adapt your code to get it working with the InceptionResNetV2. As far as I know do I have to change the input_tensor and maybe also the classifier model? Do you know what to adapt to get it working? Thanks for the great tutorial
ReplyDeleteYou should be able to simple replace VGG16 with InceptionResNetV2. Are you getting any errors?
DeleteHello,
ReplyDeleteI am getting an error - StopIteration: cannot identify image file '/Users/Anuj/Desktop/Python codes/Dataset_faces/training_set\\Ananth\\00000.png' in the predict function. The training part has been completed. Any suggestions as to why this is happening?
Looks like an image format error. Do you have the 'pillow' package installed?
DeleteThanks for the great tutorial , but how could i plot the confusion matrix for the data ?
ReplyDeletefirst of all thanks for this great tutorial!.....i getting this error
ReplyDeleteFound 2201 images belonging to 5 classes.
2018-11-14 22:27:23 PST2201
2018-11-14 22:27:23 PST{'Item1': 0, 'Item3': 2, 'Item5': 4, 'Item2': 1, 'Item4': 3}
2018-11-14 22:27:23 PST5
2018-11-14 22:27:37 PSTTraceback (most recent call last):
2018-11-14 22:27:37 PSTFile "keras_bottleneck_multiclass.py", line 233, in
2018-11-14 22:27:37 PSTsave_bottlebeck_features()
2018-11-14 22:27:37 PSTFile "keras_bottleneck_multiclass.py", line 65, in save_bottlebeck_features
2018-11-14 22:27:37 PSTgenerator, predict_size_train)
2018-11-14 22:27:37 PSTFile "/usr/local/lib/python3.5/site-packages/keras/engine/training.py", line 1781, in predict_generator
2018-11-14 22:27:37 PSTall_outs[i][processed_samples:(processed_samples + nb_samples)] = out
2018-11-14 22:27:37 PSTValueError: could not broadcast input array from shape (16,7,7,512) into shape (10,7,7,512)
plz help
Thank you for the tutorial!!! I have a question, if i show the probabilities i see the probabilities of all the labels, not only the label that was predicted. I want to show only the probability of the label predicted, anyone can help? Thanks
ReplyDeletethe loss doesnt decrease can someone suggest some solution?
ReplyDeleteThank you so much for this great tutorial. A question. How to get 'bottleneck_fc_model.h5' ?
ReplyDeleteHi I am new in Deep Learning and i m not able to understand on thing in above code. Please clear my doubt with the usage of datagen_top.flow_from_directory-
ReplyDeleteyou have used it 1st time with generator variable and 2nd time with generator_top. And in 2nd time i don't see any other purpose of using it but to get class labels only. So my question is "Could we fetch the class label at the same time when we used this function very first time?"
Hi, how do i plot the confusion matrix for the data? I was able to evaluate the accuracy and loss metrics, and I want to make a confusion matrix as well.
ReplyDeleteTraining has been started properly but the validation accuracy is not going up more than 30 even i have adjusting the drop outs also. please help me. ?
ReplyDelete