For the last 3 weeks, I've been trying to build TensorFlow from source. I wanted to get TensorFlow GPU version working on Windows with CUDA 9.2 and cuDNN 7.1. Since the pre-built wheels only work with CUDA 9.0, the only way we can get it working with 9.2 is to build it ourselves from source.
The Windows build of TensorFlow is done using CMake. The official instructions are here: https://github.com/tensorflow/tensorflow/tree/master/tensorflow/contrib/cmake
Unfortunately, as I found out after multiple attempts, the build process is not as simple as it sounds.
Every attempt I have made to build it failed so far.
But, I decided to post the steps I took - which didn't work - so that you all may be able use it as a reference if you decided to try it out yourselves. Again, note that these steps did not work.
First, I started with gathering all the dependencies to build on Windows 10:
- Visual Studio 2015 Community Edition With Update 3 (14.0.25431.01) with C++
- Anaconda Python 3.6.5
- Git for Windows 2.18.0
- Swigwin 3.0.12
- CUDA Toolkit 9.2
- cuDNN 7.1
- CMake 3.11.3
Install Anaconda Python (if you haven't already), Git, Visual Studio 2015, and the CUDA Toolkit as usual (in that order).
Need to make sure that we add CMake to path when we install.
 |
| Add CMake to PATH when installing |
For Swig, you don't need to install it. Just extract it in to a directory of your choice. I extracted mine to C:\Dev_Tools\TFBuild\tools\swigwin-3.0.12.
Similarly, extract cuDNN. I placed mine at C:\Dev_Tools\TFBuild\tools\cudnn-9.2-windows10-x64-v7.1
Now, open a command prompt, and run the following command to set the visual studio variables.
"C:\Program Files (x86)\Microsoft Visual Studio 14.0\VC\vcvarsall.bat" amd64
Switch to your build directory, clone TensorFlow, and create the necessary directories for CMake.
cd C:\Dev_Tools\TFBuild\
git clone https://github.com/tensorflow/tensorflow
cd tensorflow
cd tensorflow\contrib\cmake
mkdir build
cd build
We need to verify whether our CPU supports AVX in order to enable it in the build. Use a tool such as CPU-Z to find it.
 |
| A CPU with AVX support |
Now, we configure the build,
cmake ..  -G "Visual Studio 14 2015 Win64" -T host=x64 ^
 -DCMAKE_BUILD_TYPE=Release ^
 -DSWIG_EXECUTABLE=C:/Dev_Tools/TFBuild/tools/swigwin-3.0.12/swig.exe ^
 -DPYTHON_EXECUTABLE=C:/Users/UAMARTH/AppData/Local/Continuum/anaconda3/python.exe ^
 -DPYTHON_LIBRARIES=C:/Users/UAMARTH/AppData/Local/Continuum/anaconda3/libs/python36.lib ^
 -Dtensorflow_ENABLE_GPU=ON ^
 -Dtensorflow_CUDA_VERSION=9.2 ^
 -Dtensorflow_CUDNN_VERSION=7 ^
 -DCUDNN_HOME="C:\Dev_Tools\TFBuild\tools\cudnn-9.2-windows10-x64-v7.1" ^
 -Dtensorflow_WIN_CPU_SIMD_OPTIONS=/arch:AVX
Note the following parameters,
- -DSWIG_EXECUTABLE=C:/Dev_Tools/TFBuild/tools/swigwin-3.0.12/swig.exe - sets the path to the swig binaries
- -DPYTHON_EXECUTABLE=C:/Users/UAMARTH/AppData/Local/Continuum/anaconda3/python.exe - sets the path to the Python executable in Anaconda
- -DPYTHON_LIBRARIES=C:/Users/UAMARTH/AppData/Local/Continuum/anaconda3/libs/python36.lib - sets the path the the Python libraries
- -Dtensorflow_ENABLE_GPU=ON - setting this to ON will compile the GPU version of TensorFlow
- -Dtensorflow_CUDA_VERSION=9.2 - sets the version of the CUDA toolkit we're using
- -Dtensorflow_CUDNN_VERSION=7 - sets the version of cuDNN we're using
- -DCUDNN_HOME="C:\Dev_Tools\TFBuild\tools\cudnn-9.2-windows10-x64-v7.1" - sets the path to the cuDNN library
- -Dtensorflow_WIN_CPU_SIMD_OPTIONS=/arch:AVX - enables AVX support. Use only if your CPU supports AVX
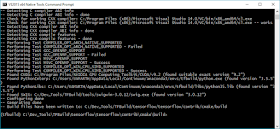
If everything runs properly, CMake will complete successfully,
 |
| CMake step completes successfully |
Now, we need to find the exact version of the CUDA Compute capability of your GPU. Go to the NVIDIA CUDA GPUs page to find it: https://developer.nvidia.com/cuda-gpus
E.g. for my GeForce 940M, the CUDA Capability was 5.0
Open the <tensorflow>/third_party/gpus/cuda/cuda_config.h file and check the following line.
#define TF_CUDA_CAPABILITIES CudaVersion("3.0"),CudaVersion("3.5"),CudaVersion("5.2")
If your GPUs capability isn't shown there you can add it,
#define TF_CUDA_CAPABILITIES CudaVersion("3.0"),CudaVersion("3.5"),CudaVersion("5.0"),CudaVersion("5.2")
Now, we're ready to run the full build,
MSBuild /p:Configuration=Release /fl /flp:verbosity=detailed tf_python_build_pip_package.vcxproj
The build can take 5+ hours if everything works our well.
Unfortunately, my build did not go so well. It fails - even after multiple tweaks and attempts - after roughly 4 hours and 50 minutes with the following error,
"C:\Dev_Tools\TFBuild\tensorflow\tensorflow\contrib\cmake\build\tf_python_build_pip_package.vcxproj" (default target) (
1) ->
"C:\Dev_Tools\TFBuild\tensorflow\tensorflow\contrib\cmake\build\estimator_python_api.vcxproj" (default target) (2) ->
(CustomBuild target) ->
  C:\Program Files (x86)\MSBuild\Microsoft.Cpp\v4.0\V140\Microsoft.CppCommon.targets(171,5): error MSB6006: "cmd.exe" e
xited with code 1. [C:\Dev_Tools\TFBuild\tensorflow\tensorflow\contrib\cmake\build\estimator_python_api.vcxproj]


"C:\Dev_Tools\TFBuild\tensorflow\tensorflow\contrib\cmake\build\tf_python_build_pip_package.vcxproj" (default target) (
1) ->
"C:\Dev_Tools\TFBuild\tensorflow\tensorflow\contrib\cmake\build\tf_python_api.vcxproj" (default target) (264) ->
  C:\Program Files (x86)\MSBuild\Microsoft.Cpp\v4.0\V140\Microsoft.CppCommon.targets(171,5): error MSB6006: "cmd.exe" e
xited with code 1. [C:\Dev_Tools\TFBuild\tensorflow\tensorflow\contrib\cmake\build\tf_python_api.vcxproj]

    25797 Warning(s)
    2 Error(s)

Time Elapsed 04:50:43.32
I have a conversation going on with the TensorFlow team on this: https://github.com/tensorflow/tensorflow/issues/19895
But, we aren't able to figure out the root cause as of yet.
Build Deeper: The Path to Deep Learning
Learn the bleeding edge of AI in the most practical way: By getting hands-on with Python, TensorFlow, Keras, and OpenCV. Go a little deeper...
Get your copy now!


No comments:
Post a Comment