Dlib is a toolkit for C++ and Python containing machine learning algorithms and tools for creating complex software to solve real world problems. Dlib provides algorithms for machine learning/deep learning, multi-class classification and clustering models, support vector machines, regression models, a large set of numerical algorithms for areas such as matrix manipulations and linear algebra, graphical model inference algorithms, and utility algorithms for computer vision and image processing. And due to C++ implementations backing most of these implementations, they’re optimized to the point that can be used in some real-time applications as well.
If you’re interested in facial recognition models or facial emotion processing, then Dlib is a library you should definitely try out.
 |
| Dlib v19.19 in action on conda on Windows |
But with all the great features in Dlib, installing it has always been a little bit troublesome because of some specific dependency requirements it needs which had a habit of almost always conflicting with your other libraries. With the latest versions however, installing Dlib has become somewhat simple.
If you’re using Anaconda Python for your python experiments, like me, you’ll find that there is no native Dlib package in the native conda package list. In one of my earlier tutorials I showed how to install the Dlib conda package from the conda-forge channel in to your conda environment. The conda-force package works perfectly fine, and it’s still one of the quickest ways to install Dlib.
But if you really want the latest official package of Dlib installed (v19.19 as the latest at the time of this writing) then using the pip package is the way to go. In order to install the Dlib pip package you’ll first have to setup some dependencies.
Note: I’m using Windows 10 for most of my coding, so here I’m showcasing steps on Anaconda on Windows. But these same steps should work on any OS.
The pip install of Dlib requires a CMake to be installed and a working C compiler installed on your system.
As the C compiler, I used Visual C++ which comes with Microsoft Visual Studio 2015 Community Edition, since I'm on Windows. If you're on Linux, GCC would work.
Note: When installing Visual Studio, make sure to select Visual C++ in the install options.
Once we have the compiler, the next thing you need to do is to install CMake.
As the C compiler, I used Visual C++ which comes with Microsoft Visual Studio 2015 Community Edition, since I'm on Windows. If you're on Linux, GCC would work.
Note: When installing Visual Studio, make sure to select Visual C++ in the install options.
 |
| Select to install Visual C++ when installing Visual Studio |
Once we have the compiler, the next thing you need to do is to install CMake.
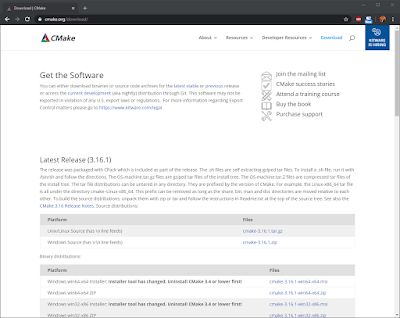
Head over to the CMake downloads page (https://cmake.org/download/), download the installer (Windows win64-x64 Installer in my case) and run the installation.
 |
| Download and install CMake |
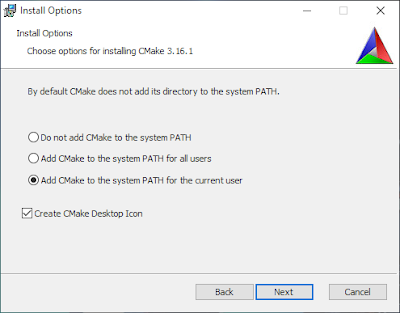
When installing, make sure to add CMake to the system path.
 |
| Add CMake to the system path |
Next, we’ll create a new conda environment. (If you are installing Dlib to an existing environment, you can skip to the 'verify CMake is installed' step). On command prompt or terminal, run:
conda create --name dlib-py37 python=3.7 anaconda
- ‘dlib-py37’ is the name of my environment.
- I’m using Python 3.7 but it should work for 3.6 as well.
- Installing the ‘anaconda’ metapackage ensures that you automatically installs the most common set of python libraries (such as numpy, and many more) in to the environment you’re creating.
 |
| Creating the conda environment |
Note: Typically, it’s a common practice to install other specific libraries you’ll be needing at the time of creating the conda environment as well. For an example, I typically use OpenCV and TensorFlow for my experiments, so I usually specify them in the command as well,
conda create --name dlib-py37 python=3.7 anaconda opencv tensorflow-gpu
When you run the command, it’ll ask for confirmation of the packages to be installed.
 |
| Confirmation of the package plan |
And then, will download and install them.
 |
| Packages being installed |
Once the environment is created you can activate it using,
conda activate dlib-py37
 |
| Environment created. Ready for activation. |
Make sure your prompt has changes to the environment name before you proceed.
 |
| Environment activated |
You can also verify whether CMake is installed and is available in the system path by running,
cmake –version
 |
| Checking the CMake version |
Now you can install the Dlib pip package by running,
pip install dlib
It will collect the package, build the wheel using CMake, and install.
 |
| Dlib pip install running |
If, however, you ger an error message like this, it means CMake is not properly installed or not added to the system path,
(If you just installed CMake, make sure you close and reopen the terminal so that it picks up the new path changes)
(If you just installed CMake, make sure you close and reopen the terminal so that it picks up the new path changes)
 |
| Error if CMake is missing |
If all goes well, you will get a successfully installed message,
 |
| Dlip pip package successfully built and installed |
To test whether Dlib installed properly, I usually use the face landmark detection example.
You can go through the official example and code here:
 |
| Dlib face landmark detection example running |
If the landmarks example runs without issues, then we’re good to go.
Now that you got Dlib working. check out some of my Dlib tutorials and examples here: https://www.codesofinterest.com/search/label/Dlib
Related Links:
Now that you got Dlib working. check out some of my Dlib tutorials and examples here: https://www.codesofinterest.com/search/label/Dlib
Related Links:
- Dlib Homepage: http://dlib.net/
- Dlib GitHub page: https://github.com/davisking/dlib
- CMake Downloads Page: https://cmake.org/download/
- Dlib Face Landmark Detection Example: http://dlib.net/face_landmark_detection.py.html
- My Dlib Examples and Tutorials: https://www.codesofinterest.com/search/label/Dlib
- Previous Tutorial on Installing Dlib Conda-Forge Package: https://www.codesofinterest.com/2016/10/installing-dlib-on-anaconda-python-on.html

thanks
ReplyDelete